

Introduction
Importance of Jump-Starting a Car Safely
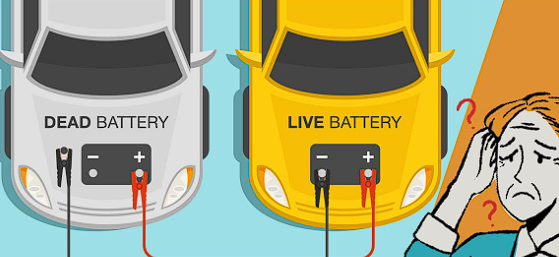
Car troubles can strike at any moment, often when you least expect them. One common issue that many drivers face is a dead battery. This experience can be frustrating and stressful, especially if you’re in a hurry or in an isolated area. Knowing how to jump-start a car safely is not just handy; it can be a real lifesaver. Safety should be your top priority during the jump-starting process. The last thing anyone wants is to create a more significant problem while trying to resolve a minor one. Improper jump-starting can lead to electrical surges, fires, or even damage to your car’s battery and electrical systems. Let’s take a closer look at why it’s essential to follow safety procedures meticulously:
- Protecting Yourself: Jump-starting involves connecting two car batteries, which can lead to sparks or other hazards if mismanaged. Understanding the correct steps reduces the risk of injury.
- Preventing Vehicle Damage: Incorrect connections can fry electrical components in either vehicle. Hence, familiarizing yourself with the procedures ensures the longevity of your car.
- Promoting Confidence: Knowing the right techniques boosts your confidence. You can approach your car troubles assertively and methodically rather than panicking.
A personal anecdote might illustrate this point well: I recall a time a friend of mine attempted to jump-start his car but accidentally connected the cables incorrectly. The result? A burned-out radio and a trip to the mechanic, all because he rushed through the process without awareness.
Basic Components Needed for Jump-Starting a Car
Before diving into the step-by-step process of jump-starting, it’s vital to gather all the necessary components. Being prepared ahead of time can make a significant difference when you find yourself faced with a dead battery. Here’s what you’ll need:
- Jumper Cables:
- Look for heavy-duty cables, usually color-coded: red for positive and black for negative. Longer cables can enhance flexibility if the vehicles are parked far apart.
- Another Vehicle with a Charged Battery:
- This can be a friend’s car or any vehicle that is currently operational and matches the battery type (ideally the same voltage).
- Safety Gear (Optional but recommended):
- Wearing safety glasses can protect your eyes from any potential battery eruptions.
- Rubber gloves can add an extra layer of protection during the process.
- Car Manuals:
- If you’re uncertain about where to locate the battery or jump-start points, having both vehicles’ manuals handy can save time and confusion.
- Working Lighter/Flashlight:
- If you’re stuck in a low-light area, be sure to have illumination available so you can clearly see what you’re doing.
Now that we have established the critical safety aspects and necessary components, it’s time to delve into the mechanics of jump-starting. As we proceed, remember that being methodical in this process is key to ensuring smooth operations and maintaining the health of both batteries involved.
Preparing for Jump-Starting
To effectively prepare yourself for jump-starting a car, follow these preliminary steps:
- Assess the Situation: Ensure the dead vehicle is in a safe and accessible location. If it’s on the side of the road, activate hazard lights.
- Gather the Equipment: Have all components organized and ready to go before you begin.
- Check Conditions: Observe the weather. Rain or snow can make jumping a vehicle more complicated.
Understanding these foundational aspects ensures not only your safety but also sets you up for success with jump-starting your vehicle. As we continue into the next sections, you’ll gain detailed insights into the mechanics of jump-starting, complete with essential steps and troubleshooting tips. This knowledge will equip you well to handle such situations confidently and effectively. With the preparations in place and a commitment to safety, you’re ready to tackle the inevitable occasions when car trouble strikes. Jump-starting can be a straightforward process, and knowing the right techniques can turn a stressful situation into a manageable one. Let’s move on to the essential basics that illuminate how a car battery works its magic and how to navigate safely through the jump-starting process.
Understanding the Basics of Jump-Starting
How a Car Battery Works
To effectively jump-start a car, it’s essential to understand how a car battery operates. Many drivers might think of a battery as merely a power source, but it plays a much more intricate role in the vehicle’s functionality. A typical car battery is a lead-acid battery, composed of six cells, each generating approximately 2.1 volts. Combined, they produce around 12.6 volts of power, necessary to start most vehicles. Here’s a simplified explanation of how a car battery works:
- Chemical Reaction: Inside the battery, chemical reactions occur between the lead and sulfuric acid, which allow the battery to store electrical energy. When you turn the ignition, this stored energy is released, helping the starter motor to crank the engine.
- Charging and Discharging: The battery recharges while the engine runs, powered by the alternator, which converts mechanical energy back into electrical energy. Without a functioning alternator, you might rapidly drain the battery.
- Battery Life: The average lifespan of a car battery is around three to five years, but factors such as extreme temperatures, driving habits, and even the types of roads you travel can affect longevity. Regular maintenance can help ensure your battery remains in good working condition.
Understanding this process is crucial; it underscores why jump-starting must be done correctly. Providing the right flow of electricity can revive a dead battery while improper connections may lead to complications.
Safety Precautions to Consider Before Jump-Starting
Jump-starting can be a straightforward task if approached with the right safety measures. Before proceeding, it’s essential to recognize the potential hazards and take appropriate precautions.
- Familiarize Yourself with the Vehicles:
- Always check the make and model of both vehicles to ensure compatibility. Not all batteries are created equal, and some vehicles may have different jump-start procedures outlined in their owner’s manuals.
- Inspect Jumper Cables:
- Examine the condition of the jumper cables before use. Look for any fraying, exposed wires, or other signs of wear that could pose a risk during the jump-starting process.
- Perform the Jump-Start in a Well-Ventilated Area:
- Working in a confined space can allow the buildup of toxic gases emitted from the battery. Always jump-start in a location with plenty of fresh air, ideally outdoors.
- Avoid Sparks:
- As mentioned earlier, connecting and disconnecting jumper cables can create sparks. It’s advisable to perform these actions away from the battery and keep flammable materials, like gasoline or oily rags, at a safe distance.
- Personal Safety Gear:
- Consider wearing safety glasses to protect your eyes from potential battery acid splashes or sparks. Gloves can also add protection against accidental shocks.
- Final Checks:
- Before connecting the cables, double-check that both vehicles are off, and remove any jewelry that could accidentally contact the battery terminals.
- Have Assistance if Possible:
- If you’re inexperienced, having someone behind the wheel of the functioning vehicle can ensure they can help with ignition or maneuvering the vehicles as necessary.
By adhering to these safety precautions, you can minimize risks and navigate the jump-starting process confidently. With vital knowledge about how car batteries function and the safety measures to implement, you are better equipped to jump-start a car correctly and efficiently. In the following sections, we will delve into a detailed, step-by-step guide on how to jump-start a car effectively, ensuring that you feel empowered to tackle this task whenever needed.
Step-by-Step Guide to Jump-Starting Your Car
Having covered the essentials of how a car battery works and the vital safety precautions to consider, you are now ready to embark on the actual process of jump-starting your vehicle. Remember, this method can vary slightly depending on specific vehicle designs, but the overall steps remain similar. Let’s break this down step-by-step.
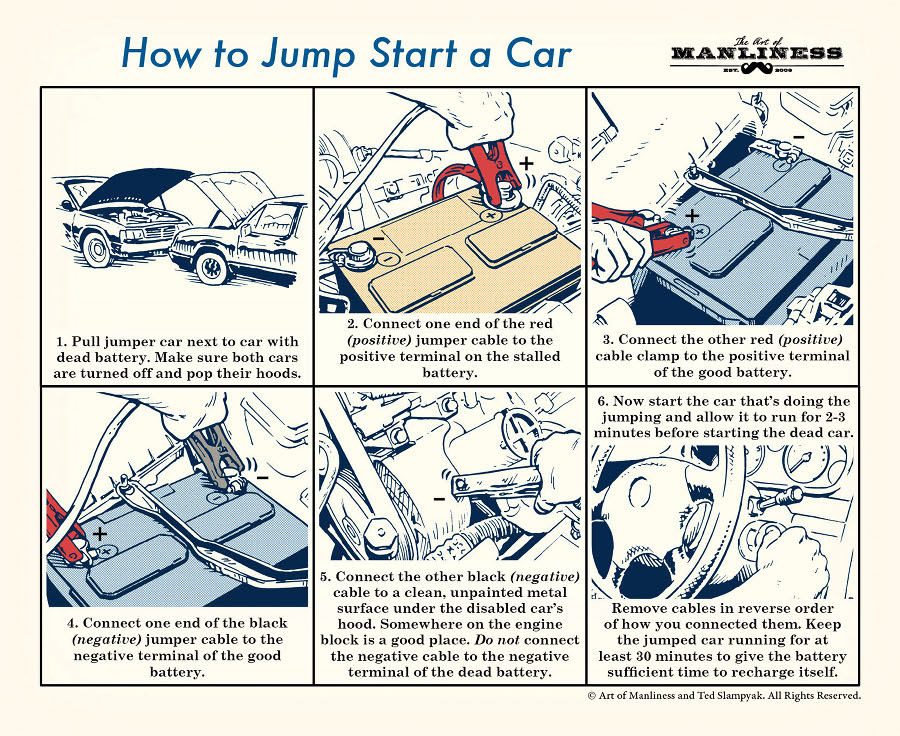
Step 1: Positioning the Vehicles
The first step in successfully jump-starting a car involves the proper positioning of both vehicles. Here’s how to do it effectively:
- Choose the Right Location:
- Ensure both cars are in a safe and well-lit environment, preferably on a flat surface. Avoid steep inclines or crowded areas.
- Align the Vehicles:
- Position the cars so that the hoods face each other but without touching. This proximity minimizes the length of jumper cables you’ll need to connect.
- Turn Off Ignition and Electronic Components:
- Switch off the ignition in both vehicles. Additionally, turn off headlights, radios, and any other electrical components to prevent a surge when you connect the cables.
- Engage the Parking Brake:
- Always remember to put both vehicles in park (or neutral if they are manual) and engage the parking brake to prevent any accidental movement.
Learning to position correctly can save both time and frustration!
Step 2: Connecting the Jumper Cables
Once you’ve positioned the vehicles correctly, it’s time to connect the jumper cables. Proper connection is crucial and can prevent damage to the battery or electrical systems. Here’s how to do it:
- Identify the Jumper Cable Ends:
- Jumper cables have two clips on each end: one red (positive) and one black (negative). Always remember that red is for positive (+) and black is for negative (-).
- Connect the Positive Cable:
- Attach one end of the red cable to the positive terminal of the dead battery.
- Connect the other end of the red cable to the positive terminal of the working battery.
- Connect the Negative Cable:
- Now, take the black cable and connect one end to the negative terminal of the working battery.
- Importantly, connect the other end of the black cable to a grounded metal part of the dead car (like an unpainted bolt or the engine block) instead of the negative terminal of the dead battery. This reduces the risk of spark formation near the battery.
- Double-Check Connections:
- Ensure the clamps are secure and not in contact with any moving parts of either vehicle.
Step 3: Starting the Dead Battery
With everything connected securely, it’s time to start the engines and get the dead battery charged. Follow these steps carefully:
- Start the Working Vehicle:
- Turn the ignition on in the vehicle with the good battery and let it run for a few minutes. This step allows the healthy battery to transfer power to the dead one.
- Attempt to Start the Dead Vehicle:
- After a few minutes, try to start the vehicle with the dead battery. If the engine turns over, you should be able to drive it shortly.
- Give it Time:
- If the dead vehicle does not start immediately, wait a few more minutes while the working vehicle runs. Then, try starting again.
- Listen for Signs:
- Pay attention to any unusual sounds, such as clicking noises. If you hear these, it may indicate that the issue is more than just a dead battery.
Step 4: Safely Disconnecting the Cables
After successfully jump-starting the dead battery, it’s time to disconnect the cables safely. Following a proper sequence is crucial to avoid potential electrical mishaps:
- Turn Off Both Vehicles:
- Before disconnecting, turn off both engines to avoid any electrical overload. (Depending if the battery is bad, turning off might not able to crank start the vehicle, without jump start.)
- Remove the Negative Cable:
- Start by removing the black cable connected to the grounded metal part of the dead vehicle followed by the black cable from the working battery.
- Remove the Positive Cable:
- Next, carefully disconnect the red cable from the positive terminal of the working battery and finally from the dead battery.
- Store the Cables Safely:
- Keep the jumper cables neatly stored away to avoid damage before your next potential encounter.
- Check Everything:
- Ensure everything is secure, and check that the revived vehicle is running smoothly before you drive away.
With these detailed steps in mind, you are now well-equipped to handle the jump-starting process confidently. Next, we’ll discuss troubleshooting common issues that may arise during this process, ensuring that you are fully prepared for any challenges that may come your way!
Troubleshooting Common Issues During Jump-Starting
Even with a clear and systematic approach, jump-starting a car may sometimes come with its own set of challenges. Knowing how to identify potential problems and having strategies to deal with them can make all the difference in successfully reviving a vehicle. If you find your jump-starting effort not yielding results, don’t panic. Read on for insights on identifying issues and effective troubleshooting tips.
Identifying Potential Problems
Recognizing when something’s not right during the jump-starting process is crucial. Here are some common signs that indicate potential issues:
- Clicking Sounds When Turning the Key:
- If you hear a rapid clicking noise when you attempt to start the vehicle, it may suggest a weak or dead battery.
- Ensure that the cables are securely connected, as poor connections can lead to insufficient power transfer.
- Slow Cranking:
- If the engine turns over slowly but fails to start, this could indicate that the battery has some charge but not enough to start the engine. In this case, allow more time for the healthy battery to charge the dead one.
- No Response at All:
- If turning the key results in no sound or lights, this might point to an issue beyond just the battery, such as a malfunctioning starter or blown fuses. A neutral safety switch might not be engaged, especially in automatic vehicles.
- Flashing Dashboard Lights:
- Flickering lights on the dashboard can indicate a battery or electrical system issue. It’s essential to verify that connections are secure and assess if the battery might be faulty.
- Corrosion or Damage:
- Inspect both battery terminals and cable ends for corrosion build-up, which can impede proper conductivity. Rotted or damaged cables might also need replacement.
I once encountered a situation where my car was making slow, grinding sounds when cranking. After checking the jumper cables and connections, I realized one of the battery terminals was rusted. A good cleaning turned out to be all I needed to get back on the road!
Tips for Dealing with Difficulties During the Process
When facing troubleshooting hurdles while jump-starting, staying calm and methodical is key. Here are some practical tips to guide you through any complications you might encounter:
- Double-Check Connections:
- If the car doesn’t start as expected, ensure that the jumper cables are secure and connected correctly. The red clamps to the positive terminals and the black clamps properly grounded as discussed previously.
- Wait and Retry:
- Allow more time for the working battery to charge the dead one. Even if it doesn’t start immediately, sometimes a mere few minutes can make a big difference.
- Using a Car Battery Charger:
- If possible, try using a portable car battery charger instead. This handy tool can provide a more prolonged charge compared to jumper cables and ensures that the battery is charged adequately before starting.
- Test for Electrical Issues:
- If problems persist, test the fuses and electrical systems. A blown fuse could prevent the vehicle from starting, so check the fuse box according to the vehicle manual.
- Check the Ground Connection:
- If you suspect the ground cable isn’t working effectively, try moving the black cable to a different metal part of the engine. This can sometimes create a better connection and allow the electrical current to pass through effectively.
- Call for Professional Help:
- When in doubt, never hesitate to contact a mechanic or roadside assistance service. They have the expertise to diagnose issues that might be beyond basic troubleshooting.
- Carry a Jump-Start Battery Pack:
- For future situations, consider investing in a portable jump-start battery pack. These devices are user-friendly and can jump-start your vehicle without the need for another car. Great convenience for emergencies!
Capitalize on each opportunity to learn while troubleshooting. Soon enough, you will hone your skills and become adept at diagnosing and addressing jump-starting issues. While troubleshooting can feel daunting, think of it as an opportunity to learn and enhance your problem-solving abilities. By recognizing the signs of common issues and knowing how to address them, you will approach any future jump-start situations with greater confidence and assurance. In the next section, we will discuss the essential post-jump-starting checks you should perform and maintenance tips to keep your vehicle running smoothly long after a jump-start.
Post-Jump-Starting Checks and Maintenance Tips
Having successfully jump-started your vehicle and navigated through the associated challenges, you now find yourself in a position to ensure that your car remains healthy and functions optimally. It’s essential to take a few post-jump-starting checks and incorporate preventive maintenance to minimize the chances of needing another jump in the future. Let’s dive into crucial aspects of battery health and preventative measures.
Checking the Health of the Battery
Once your car is up and running, it’s important to assess the health of the battery to ensure it won’t leave you stranded again. Here are some key checks to conduct:
- Visual Inspection:
- Begin with a thorough visual examination of the battery. Look for signs of corrosion, which can appear as a white, crusty substance around the terminals. If you spot this, it can impede the connection and battery performance.
- Tighten Connections:
- Ensure that the battery terminals are tightly connected. Loose connections can lead to electrical issues that may hamper vehicle performance. Periodically check these connections, especially after a jump-start.
- Battery Test:
- Using a multimeter, check the voltage of the battery. A healthy, fully charged battery should register at least 12.6 volts. If the reading is below 12.4 volts, it may be time for a charge or even a battery replacement.
- Perform a Load Test:
- Many auto parts stores offer free battery testing services, including load testing. This test evaluates the battery’s ability to hold a charge under load. It’s a good idea to have this done if you suspect that your battery is weak.
- Monitor Performance:
- Pay attention to how your car is starting over the next few days. If it shows signs of sluggishness (slow cranking or dim lights), it may indicate that your battery isn’t holding a charge effectively.
Preventative Measures to Avoid Future Jump-Starts
Taking proactive steps now can save you from future headaches and ensure a reliable vehicle. Here are some effective preventative measures to keep your battery in excellent condition:
- Regular Maintenance:
- Schedule routine vehicle maintenance that includes battery checks as part of the service.
- Clean battery terminals regularly to prevent corrosion build-up.
- Test Your Battery Annually:
- Have your battery professionally tested at least once a year. This proactive approach can help identify potential issues before they result in a dead battery.
- Limit Short Trips:
- Frequent short trips don’t allow the alternator sufficient time to recharge the battery fully. Whenever possible, try to combine errands to optimize battery charging.
- Understand Your Climate:
- Extreme temperatures have a significant impact on battery performance. If you live in particularly hot or cold climates, consider purchasing a battery rated for such extremes.
- Use a Battery Maintainer:
- If your vehicle often sits for extended periods, a battery maintainer or trickle charger can keep the battery charged without risk of overcharging. This device is especially helpful for classic cars or those used infrequently.
- Install a New Battery if Necessary:
- If your battery is more than one to two years old, consider replacing it as a precaution. A new battery can provide peace of mind, especially before taking long trips.
- Pay Attention to Electrical Components:
- Make a habit of turning off headlights, interior lights, and other electronic components when the vehicle is not in use. This simple practice can help avoid unnecessary battery drain.
By incorporating these checks and taking preventative measures, you can ensure that your car battery remains healthy and robust, considerably decreasing the likelihood of facing a dead battery situation in the future. In conclusion, a jump-start can be an easy fix for a common problem, but maintaining your vehicle’s battery health is essential to avoid repeating the ordeal. With the right understanding of battery function, vigilant checks, and preventative actions in place, driving can remain a worry-free experience, allowing you to enjoy the open road ahead.
Conclusion
As we’ve navigated through the detailed process of jump-starting a car, it’s crucial to take a moment to reflect on the key safety procedures and best practices we’ve covered. Not only does this ensure that you understand how to safely and effectively revive a dead battery, but it also aims to enhance your overall confidence when faced with such situations.
Recap of Safety Procedures
Safety isn’t just a checklist—it’s an integral part of the jump-starting process that can prevent injuries and mitigate damage to your vehicle. Here’s a recap of the essential safety procedures to remember:
- Choose a Safe Environment:
- Make sure the vehicles are parked on a flat, stable surface, away from busy traffic. A well-lit area is preferable, especially during nighttime.
- Inspect Jumper Cables:
- Prior to use, check the jumper cables for any signs of wear or damage. Look for frayed wires or exposed connections to avoid potential hazards.
- Turn Off All Electronics:
- Ensure that both vehicles have their ignitions turned off, and disable all electronic components to avoid electrical surges during the connection process.
- Proper Connection Order:
- Always connect the jumper cables in the correct order:
- Red to Dead: Attach the red cable to the positive (+) terminal of the dead battery.
- Red to Live: Connect the other end of the red cable to the positive (+) terminal of the working battery.
- Black to Live: Connect the black cable to the negative (-) terminal of the working battery.
- Black to Ground: Finally, attach the remaining black cable to a grounded metal surface on the dead car, avoiding the battery terminal.
- Always connect the jumper cables in the correct order:
- Stay Vigilant:
- During the entire process, remain focused and vigilant. Do not leave cables unattended or allow anyone to touch them while in use.
- Disconnect in Reverse Order:
- Once the dead vehicle is revived, carefully remove the jumper cables in the reverse order, ensuring that the clamps don’t touch each other in the process.
- Monitor the Vehicle:
- After successfully jump-starting, pay attention to the revived vehicle. Look out for any signs of prolonged issues, such as sluggish starting, which might indicate further underlying problems.
Reflecting on my own encounters, I vividly remember a time when a group of friends and I jumped my car at the beach. By carefully following these safety protocols and being attentive, we not only saved the day but also avoided potential mishaps that could have arisen from overlooking basic procedures.
Final Thoughts on Jump-Starting Your Car Safely
Jump-starting your car can be an easy task, but it requires a mindful approach to ensure safety and effectiveness. Understanding how a car battery works and knowing the proper techniques enables you to tackle a potentially stressful situation with confidence. With the information provided:
- Understanding Battery Health: You’ve learned the importance of assessing battery condition post-jump-start and performing regular maintenance checks.
- Proactive Steps: Incorporating preventive measures can keep your battery in good shape and significantly reduce the chances of facing another dead battery scenario.
- Warm-Up to Experience: As with any skill, experience enhances ability. Each jump-start provides a learning moment. Embrace those moments; they contribute to your confidence and competence.
Always keep in mind that while jumping a car is a practical skill, each situation may vary. It’s a good practice not only to know how to jump-start a car but to remain adaptable—be ready to troubleshoot and think critically if something doesn’t work as expected. Lastly, a portable jump starter can provide that extra layer of security for those who are often on the road. It offers independence and peace of mind for situations when assistance isn’t readily available. Remember that you have the tools, both informational and practical, to address issues safely and effectively. Car trouble can be an inconvenience, but with proper preparation and know-how, you can navigate it smoothly, keeping you on the road for all your adventures ahead. Safe travels!